"Decorate your blog with tutorials provided. Please click on a category tutorials on your right side to see more tutorials. Most widgets tutorial are compatible with the basic template that has been provided by blogger.com. Some widgets, maybe not for a specific templates that are provided by other personal bloggers. But you can try it first. If it did not work, please remove this widget from your blog. Good luck."
Welcome Exposure Image In Blog

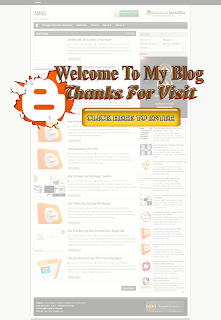
The welcome screen image will appear at the beginning, before going into your blog. After the welcome click on the image, the blog will appear with the effect "fade in" interesting. Like a wide open door before entering the house. Follow the tutorial below.
* Before that, you are advised to backup template in advance, because once you've apply this in the blog widget code, he can not delete. So take precautions, backup template in advance.
Here's how:
1) Sign in blogger account
2) Dashboard> Design> Edit HTML> Tick the box "Expand Widget Templates"
3) By using ctrl + F (press simultaneously on the keyboard), find the code
]]></b:skin>
4) Then, copy and paste the code below BEFORE / ABOVE code]]> </ b: skin>
</style></head>
<script language="javascript" type="text/javascript">
/* toggle() checks to see if the images has already been faded
or not and sends the appropriate variables to opacity(); */
function toggle(el,milli) {
// Get the opacity style parameter from the image
var currOpacity = document.getElementById(el).style.opacity;
if(currOpacity != 0) { // if not faded
fade(el, milli, 100, 0);
} else { // else the images is already faded
fade(el, milli, 0, 100);
}
}
/* changeOpacity() uses three different opacity settings to
achieve a cross-browser opacity changing function. This
function can also be used to directly change the opacity
of an element. */
function changeOpacity(el,opacity) {
var image = document.getElementById(el);
// For Mozilla
image.style.MozOpacity = (opacity / 100);
// For IE
image.style.filter = "alpha(opacity=" + opacity + ")";
// For others
image.style.opacity = (opacity / 100);
}
/* fade() will fade the image in or out based on the starting
and ending opacity settings. The speed of the fade is
determined by the variable milli (total time of the fade
in milliseconds)*/
function fade(el,milli,start,end) {
var fadeTime = Math.round(milli/100);
var i = 0; // Fade Timer
// Fade in
if(start < end) {
for(j = start; j <= end; j++) {
// define the expression to be called in setTimeout()
var expr = "changeOpacity('" + el + "'," + j + ")";
var timeout = i * fadeTime;
// setTimeout will call 'expr' after 'timeout' milliseconds
setTimeout(expr,timeout);
i++;
}
}
// Fade out
else if(start > end) {
for(j = start; j >= end; j--) {
var expr = "changeOpacity('" + el + "'," + j + ")";
var timeout = i * fadeTime;
setTimeout(expr,timeout);
i++;
}
}
}
</script>
<div class="input" onClick="javascript:toggle('wise', 3000); this.style.display='none';
document.getElementById('june').style.display=''">
<center><img src="URL IMAGE WELCOME"
style="opacity:0.4;filter:alpha(opacity=40)"
onmouseover="this.style.opacity=1;this.filters.alpha.opacity=100"
onmouseout="this.style.opacity=0.7;this.filters.alpha.opacity=40"/></center>
</div>
<div id="wise" style="filter : alpha(opacity=0); -moz-opacity : 0; opacity : 0;">
<div id="june" style="display : none;">
<body>
note:
URL WELCOME IMAGE, you enter the url welcome image you like. Image welcome to choose from down there, copy the URL provided, or you can create yourself.

https://blogger.googleusercontent.com/img/b/R29vZ2xl/AVvXsEhjrJh3t4vagkMGVF2ykA28Qzp14kXggPR1RCSXYMsC1jHixTns-mGdZyJOoS8e-xU7xUvgB9687jDxBNfhnMmKktPYXjEo4lGvjmbhvkxRJ5yF0Y0vUkYOyhnMP3fLPzXlOcJFOzzcjvfK/s1600/w1.png

https://blogger.googleusercontent.com/img/b/R29vZ2xl/AVvXsEiUzBnLT71NuCx5gX8fOkGW2bxcvE8aIIRfJTNnabrzfZsAkqoz8O3ghcBeXQAriK7-OvChm0Ui_ZqA9B8iHwm_VNq4DJ-wBpgRIFdgSngCs9cpXV5kf5EgX9oqXtFj_j3yujynjxWMdI_S/s1600/w2.png

https://blogger.googleusercontent.com/img/b/R29vZ2xl/AVvXsEh1Hhyphenhyphen3j9DDsKP02kGBJAoavEN04ksGJMvAVHLAYkqVlkTN9tfHrx1xhVUwgRLIBuLNOiyW5N2Q0CzJEi4cYTOHh_A13Xk2sPDUoG2atFwY1IqUgz76JpMcaiO9vfvVdtIR5vP2Fpp4ExFz/s1600/w3.png

https://blogger.googleusercontent.com/img/b/R29vZ2xl/AVvXsEgmBLxfXAoDx4-AjLaNSqTRwDZMtTZKxsZuuqXU8ZSB84xMLjzY_EdtCF_wcEJNUByv09ZcJbOx2D5EscsywlBpQvYczFM_cA8Oa0j-Re_MtG6jMeqywzyhwn3nvja-27lEC-vnGC09UeY8/s1600/w4.png

https://blogger.googleusercontent.com/img/b/R29vZ2xl/AVvXsEiRByDROh3g9NBKK1uUpEsbV4Ql9MClU3ZXYz5o9LpEHCGMwJqkU4EeBzmSGXzH10Z17484SryxxW6DKSCBkRN_mQ__DCmtV_ueX_lUdJSuMiQf9EDzxAtWlBDxXcOxlYqcQFD85nV9nazs/s1600/w5.png
6) Lastly click on the preview, if no error, then click save template.
Please read more others tutorial about blogger blog and widgets.
Thank you for read...happy blogging......


0 comments:
Post a Comment